Wednesday, June 6, 2012

Fun Knit Necklace


I want to share a fun necklace I made out of an old knit turtleneck.
To be honest I wasn't really sure if I liked it at first but it has really grown on me.  I like the braid and the pop of color the beads add.


Here is how I did it:
I took my old gray turtleneck and cut strips of material (I'm guessing I used about 2" strips - you can make as thin or thick as you want)
I then opened one end so I had really long strips. 
I took 3 strips and sewed them one end together so I could braid the three strands.  (Note: when braiding the strands it will seem to take FOREVER because they are stretchy and grow!!!!)
Figure out how many braided strands you want to do and play around with adding beads to some of them.  - I used fun, big, blue beads I bought at Joann's - (with a coupon of course!!!) and 3 finished braided strands.

I actually put all my beads on the same braided strand - but again you can do whatever you want.  Play with it and find the look you like best.
Sew your ends together when you are ready to finish the necklace.  I did not sew all my braided strands together but I did inter loop them so they can not be separated now.  You can do this however you want - I liked the look of inter looping but if you want the versatility of wearing each braid separately you may want to keep them as individuals


That is all there is to it....very easy - fun - chic and cheap :)


**If you want to see what I did with the extra strips check out the cat cuff :) - (the necklace that was a fail was different from this one in case your wondering )Warning if you have cats ~ they will want to play as you try to braid! But they are so cute how can you get mad?!**

Blessings,
Linda


Wednesday, May 9, 2012

Upcycled Bags

One of the things I love to do is take something old and make it into something new.  Pillow cases are great for this!  I look at rummage sales and thrift stores for cute vintage pillow cases.  Some of them remind me of when I was little others are just fun....bright vibrant colors or cute designs.

Here is one I recently swapped on whoopdwhoop.  It is a vintage pillow case that I modified the pattern on.  I wanted to keep the band of white showing.


I think it turned out cheery :)  These are great bags to use at the farmers market, the grocery store, the library, the pool...  I think you get the idea!  The best part is because they are made from pillow cases they are completely washable!

Blessings,
Linda

Linking at: http://www.thestuffofsuccess.com
http://www.uncommondesignsonline.com
http://adventuresofadiymom.blogspot.com

Friday, April 6, 2012

Spring Decorating

Had a chance to do a little Spring decorating......

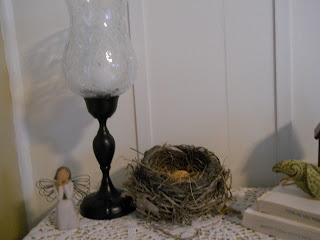
I found the candle holder at Goodwill and loved the shape and the glass and the price - $3.99.  The bottom was a golden brass color that I didn't love.


 So I did what any good crafter does and I sprayed painted it Oil Rubbed Bronze - Satin finish and now love the whole thing :)

The cabinet is one I redid a few months ago.  You can see the cabinet redo here.  I liked it but still felt something was missing. I saw a redo someone else did and used upholstery tacks to outline the piece and I loved the results so I thought I would try it.

I like the way it turned out but still can't decide if I over did it with the tacks.  Maybe I should have just did the top and bottom of the cabinet?  What do you think?  Did I get too carried away?

Here is a close up of one of the little birds I have been busy making.  You can get one for yourself by going to whoopdwhoop.com  (only 2 whoops each)

I also found a birds nest and added some fake eggs to complete the look.
So overall I like my Spring decorating and hope you enjoyed seeing it too :)

Have a blessed day!
Linda

linking up:


Monday, March 19, 2012

Plate Wall

I know these have been around for awhile.  I know this is not my original idea but I just LOVE how my plate wall turned out!


 I love the plates.... I love the style....I love the simplicity..... I love it all!
I love that each plate is different :) 
It was so hard to get a picture that wasn't blurry...but I think you can see the detail.....
I love that each seems to be a work of art.
I wonder the stories these plates would tell....
What special days were celebrated?
Whose kitchen did they come from?
What was the favorite treat to serve on them?


I know most people hang their plates with the plate hangers.  I personally don't care for those so I bought picture hangers and glued them on the back of my plates.  I tried a strong glue that I have seen recommended for other projects.  It sort of worked until I hung a plate on the wall...the hanger came off and knocked another plate down and broke them both :(
I was so sad!  One was a really old plate that I loved....
So I then used gorilla glue and it has worked wonderfully!!!


I really think it adds so much to the room without a lot of money.  
I like the the design and I love using one different color plate to make it stand out.  I'm debating whether I should add a decal to the plate....
Still can't decide. :)
Either way I still think it looks better in person!

 
Blessings,
Linda

linking up at:


Friday, March 2, 2012

Tweet Tweet


I am a blog stalker and not afraid to admit it! I subscribe to ALOT of people's blogs and it almost becomes overwhelming at times when I don't keep my email up to date. But I don't want to miss out on so many cute ideas! I love the creativity that abounds in blog-land.

My latest project was inspired by one of the talented ladies I stalk....um I mean follow :) She got the idea from someone else so I don't feel bad. Well actually I wouldn't have felt bad anyway. My mom always told me that copying is the highest form of flattery. No she wasn't encouraging cheating at school....not that kind of copying silly!

The only problem with looking at so many projects is I forgot where the original came from. If I find it again I will link it up....promise!!!!

I decided I wanted a new pillow one of the chairs downstairs. I recently redid the room and changed out the big blue chair with a neutral slip cover. I was going to make a slip cover out of drop clothes but when I found one at Kohls on clearance for about $40 and I had an extra 30% off how could I go wrong! Besides I don't think I could have made it any cheaper and my sanity was worth spending the $ on! 
 
Back to the project......
Here is the old pillow. (If you have an old pillow that doesn't work for you it is very easy to remake it into something that will!)


I cut out a square that would be the front of my pillow. I used a heavier, duck type of material. Something I had found in the remnant section a long time ago. Next I cut the back pieces. I cut 2 squares that would overlap so I could make the pillow slide into the case when finished. The back pieces overlap. All I did was fold over the ends when I sewed them.

I made a pattern out of cardboard for my birds. I traced them onto the fusible web and cut them out and ironed them on the material I wanted to use. I then ironed on my pieces to the pillow front. I embroidered by the hand the legs and ground and sewed on some buttons. I then pinned on the back pieces on and sewed it up. This is a fairly fast and inexpensive project that I really enjoyed.
Now I have cute little birds on a fun pillow. I still have not seen my first robin but I know Spring is on it's way when I glance at my cute pillow.
 
Blessings,

Sunday, February 26, 2012

Spring Fever!

Did you know it was possible to have spring fever while there is snow on the ground?  Well it is and I am proof.....I have it and I have it bad!
It's not like we have had a bad winter…. Actually it has been very mild compared to most.  Snow has been minimal and the bitter cold only lasted less than 2 weeks.  I am okay with that really!
However, this week will be March....
I am ready for spring flowers, warmer weather and all the beautiful things spring brings.
So in order to help treat this "fever" I decided on a very simple project and I like the way it looks....

I have grapevine wreaths hanging on the shed door. 
These are wreaths I made using wild grapevine.
(Note to self....Next house WILL have a garage!)
Anyways...at Christmas time I hang red bows on them but the rest of the year I have left them blank until now.  I was thinking about burlap and thought I would cut strips and simply wrap them around the wreaths to dress them up a bit.


I added a bow on the top and that was all she wrote :)
I really like the way it looks...rustic and simple.  I think the burlap will weather well  and if not no harm done.
I have another plan for a cute banner along the top of the shed.  We will see if it looks the same when done as it looks in my head.  I will share the results when I finish that project :)


Simple, easy project....just what the doctor ordered!

Blessings,

Monday, February 20, 2012

Happy Monday


Happy Monday!
I would love to be home right now lounging in the sunlight...taking a nap and dreaming a wonderful, sweet dream about..............


Spending time at the ocean


and feeling the salt air in my face and the water on my feet :)

Or maybe eating a yummy treat.................


After a day of biking in the sun with.....


the one I love...........

Do me a favor and don't wake me....I am enjoying this dream!!!!